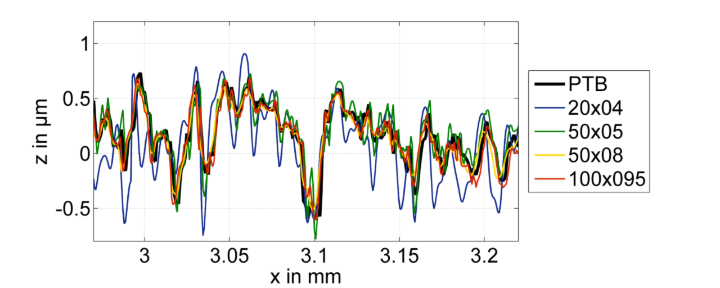
As confocal sensors have become increasingly popular in industrial inspection of rough surfaces in recent years, severe measurement artifacts have been observed. In contrast to classical two dimensional imaging, insufficient optical resolution appears not to lead to a low pass behaviour of confocal sensors. Instead figure 1 shows the rise of high frequency overshooting in the measurement result of a rough surface as the numerical aperture and therefore the optical resolution of the sensor is decreasing. Established characterization and calibration methods commonly fail to predict these artifacts. Therefore planning and evaluation of measurements of rough surfaces today still is an iterative procedure relying on personal experience of measurement experts. Therefore, within the joint project OptAssyst (see www.optassyst.de) the Institut für Technische Optik developes a model based assistance system for confocal inspection of rough surfaces. This assistance system deduces a simple estimate of the measurement uncertainty in dependence of the surface roughness from sophisticated simulation scheme for confocal sensors. Based on this estimate it is possible to systematically chose a set of sensor parameters that are suited for the measurement of a given rough surface. Furthermore the assistance system is capable of judging the measurement uncertainty in a given measurement.

References
- F. Mauch, W. Lyda, M. Gronle, W. Osten, Improved signal model for confocal sensors accounting for object depending artifacts, Optics Express, Vol. 20, Issue 18, pp. 19936-19945 (2012), http://dx.doi.org/10.1364/OE.20.019936
- F. Mauch, W. Lyda, W. Osten, Object Depending Measurement Uncertainty of Confocal Sensors, in Fringe 2013, Springer Berlin Heidelberg edited by W. Osten (2013), http://dx.doi.org/10.1007/978-3-642-36359-7_82
- F. Mauch, W. Lyda, M. Gronle, W. Osten, Object-depending artifacts in confocal measurements, Proc. SPIE 8466, Instrumentation, Metrology, and Standards for Nanomanufacturing, Optics, and Semiconductors VI, 846609 (October 11, 2012); http://dx.doi.org/10.1117/12.929214
- F. Mauch, W. Lyda, W. Osten, Model-based assistance system for confocal measurements of rough surfaces, Proc. SPIE 8788, Optical Measurement Systems for Industrial Inspection VIII, 87880U (May 13, 2013); http://dx.doi.org/10.1117/12.2019991

